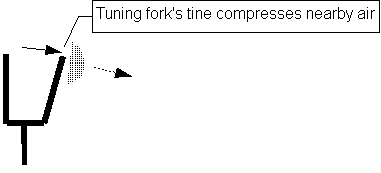
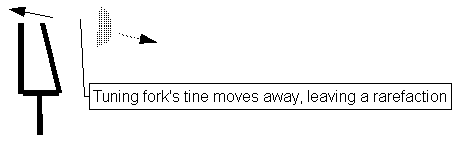
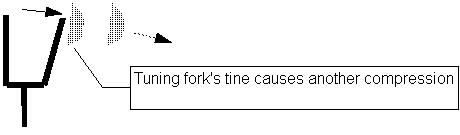
Uncompressed
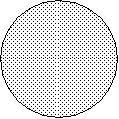
Compressed
Rarefied
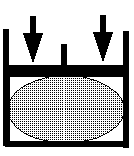
(Stretch the balloon)
Introduction
to Audacity
Version 20040511B
by
Barry
G. Wong
World Wide Web: https://mythanks.tripod.com/
All
of the textual content and graphical content
in this document are
by Barry G. Wong,
except where otherwise specified.
Copyright
2004 by Barry G. Wong. All rights reserved.
Table of Contents
I. Sound
A. Compression
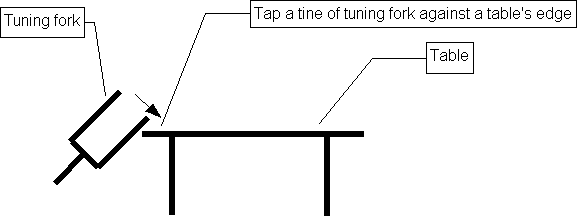
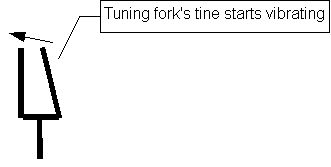
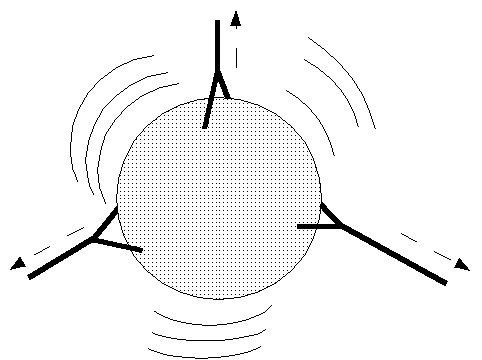
B. Tuning fork
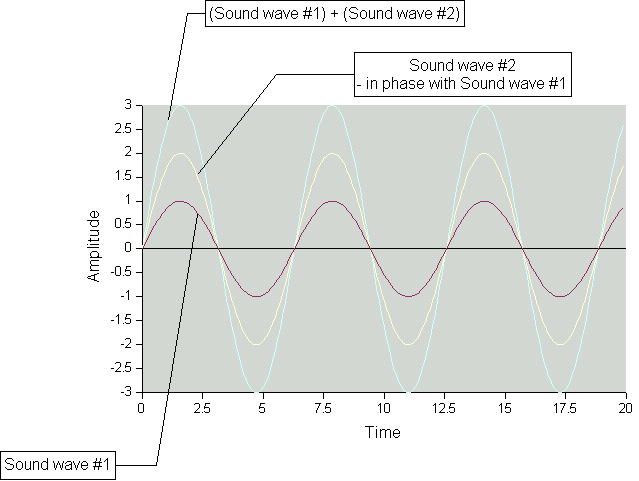
1. Oscillating amounts of compression
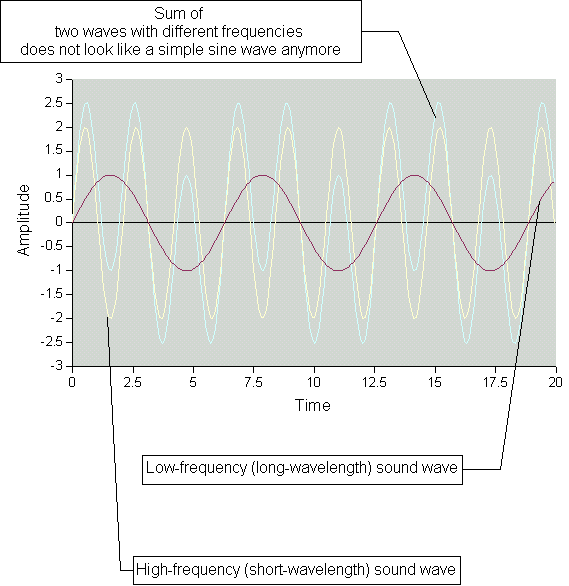
2. Addition – 2 different frequencies
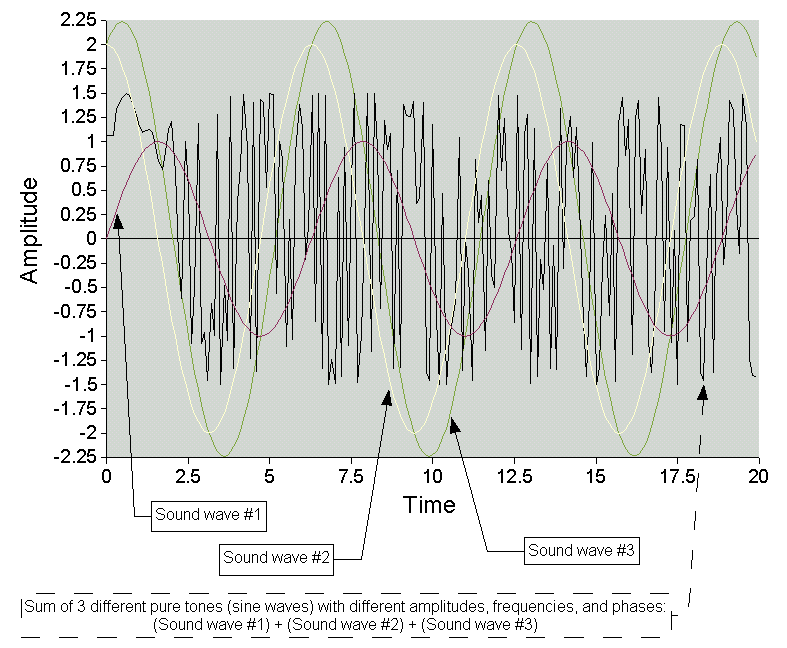
3. Addition – 3 different amplitudes, frequencies, and phases
II. Capture and digitization of sound
A. Analog
B. Digital
1. Binary
C. Analog to Digital Conversion (ADC)
D. Sampling
III. Downloading
A. Apply appropriate security procedures
1. Small files
a. Browsers
(1) Microsoft Internet Explorer
2. Large files
(1) GetRight
IV. Compression (and decompression) software
A. Compression software for Microsoft Windows (“Windows”)
1. Enzip
V. Audacity
A. Audacity World Wide Web site
1. Audacity
b. MyThanks
1. Source code
3. Open Source or Closed Source
C. Downloading
1. Microsoft Windows (“Windows”) version
a. Software
(1) Audacity
(2) VST Enabler
(3) MP3 Encoder
(a) Licensing
(1) Manual
D. Installation
a. Software
(1) Audacity
(1) Manual
1. Preferences
a. Safety (in case of deletion of original source audio)
(1) File > Preferences... > Audio I/O > Playback > Device: > {Pull-down menu}
(2) File > Preferences... > Audio I/O > Recording > Device: > {Pull-down menu}
(1) File > Preferences... > Audio I/O > Recording > Channels: > {Pull-down menu}
(a) 1 (Mono)
(b) 2 (Stereo)
(1) File > Preferences... > Quality > Default Sample Rate > 44100 Hz
(2) File > Preferences... > Quality > Default Sample Format > 16-bit
e. Fast, not-full hard drive (for temporary storage by Audacity)
(1) File > Preferences... > Directories >Choose...
g. Restart of operating system / computer system
1. Windows
G. Recording
1. Line in
I. Export for external playback
VI. Terms
Think of a balloon inflated with air molecules.
|
Uncompressed |
|
|
Compressed |
|
|
Rarefied |
|
|
|
|
|
|
|
|
|
|
|
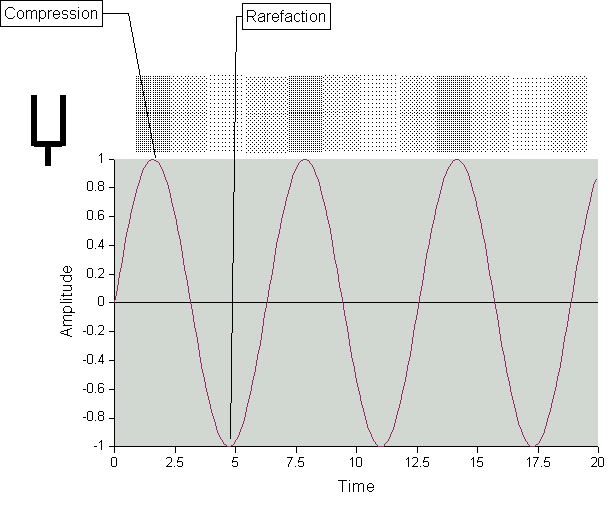
Signals are continuous.
Digital electronic computers use numeric digits to represent information.
Many digital computers represent information with a sequences of the two digits, 0 and 1.
The computers might use one electrical voltage to represent 0 and another voltage to represent 1.
Audio or video is converted from an analog (smooth) format to a discrete (broken-into-pieces) format.
Then the results are encoded as sequences of zeros and ones
Then digital computers, by working with those sequences of zeros and ones, can handle that audio or video.
Suppose you are listening to a radio news report which lasts 3 minutes.
Now imagine that you put earplugs into your ears for 10 seconds, and then remove the earplugs.
You would have missed some of the news report.
Suppose you continue alternately plugging your ears for 10 seconds and then unplugging your ears in this way repeatedly until the end of the news report.
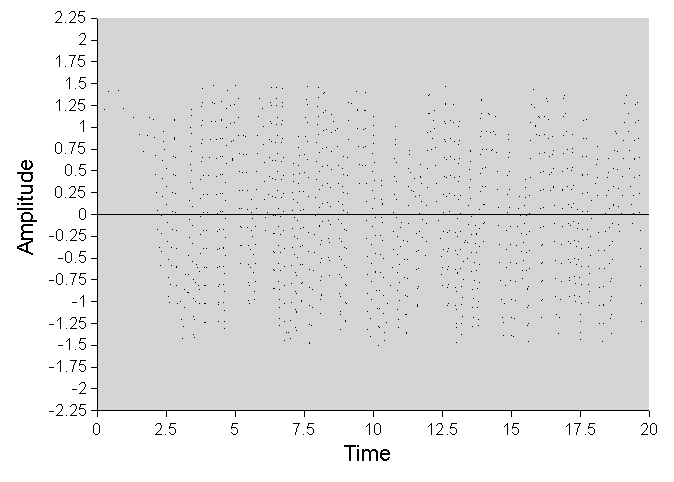
Then, you would have heard only a few samples of the news report. You would have been hearing samples not very frequently. In other words, you would have sampled with a low sampling frequency.
If someone asked you to say what was in the news report, then you might be able to provide only a small amount of information.
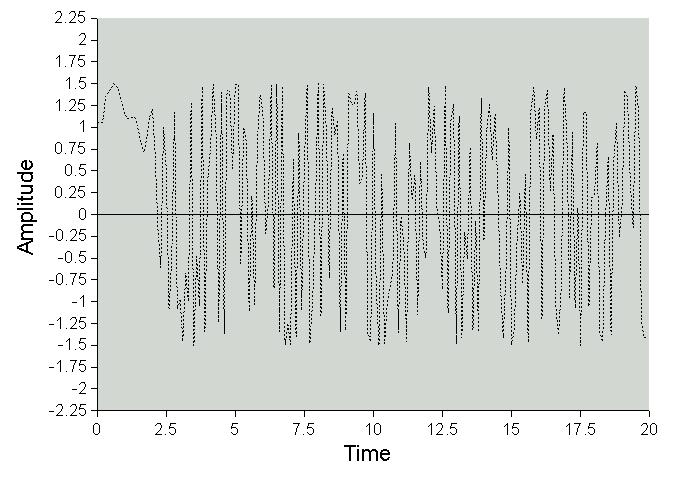
Now imagine that you put earplugs into your ears for only one-half of a second, and then removed the earplugs.
Suppose you continued alternately plugging your ears for one-half second and then unplugging your ears in this way repeatedly until the end of the news report.
Then, you would have heard many samples of the news report. You would have been hearing samples fairly frequently. In other words, you would have sampled with a high sampling frequency.
If someone asked you to say what was in the news report, you might be able to provide a lot more specific information. The accuracy of your summary might also be higher.
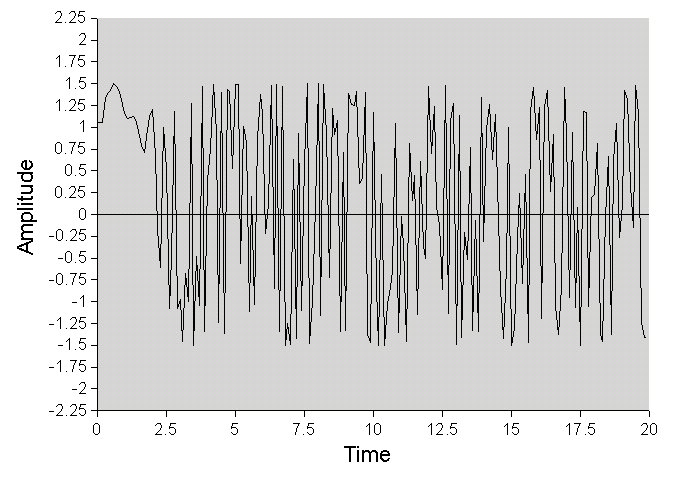
Look at the same sound waveform viewed at low and high sampling frequencies.
|
Low sampling frequency |
|
|
High sampling frequency |
|
|
Waveform being sampled |
|
In general, whenever you receive software – via downloading or via other means – use appropriately updated antivirus software to scan the received software for viruses, malware, and similar threats.
Consider use of appropriate personal firewall software, if appropriate.
Right-click the hypertext link for the file to be downloaded.
Click on Save Target As....
Follow the instructions to save (download) the file to (for example) the Windows Desktop.
Go to http://www.getright.com/ .
Download and install GetRight software.
Follow appropriate instructions for use of that software.
EnZip is for use with .zip compressed files.
Audacity Web
site
http://audacity.sourceforge.net/
From The HowToMakeRadio Guide Web site, follow the Audacity link:
http://mythanks.tripod.com/howtomakeradio/ > The HowToMakeRadio Guide > Audacity
http://mythanks.tripod.com/ > HowToMakeRadio> The HowToMakeRadio Guide > Audacity
Search for
HowToMakeRadio
At the HowToMakeRadio Web site, follow
the link titled
The
HowToMakeRadio Guide
Follow the link titled
Audacity
A (for example) person types special instructions in English (or another “natural language”) for a computer.
This set of instructions by (for example) a person for the computer is the source code.
A computer uses special procedures to translate, adjust, and merge the source code into instructions that are simpler and more efficient for the computer.
These translated, adjusted, and merged instructions that the computer can execute or follow are called executable code.
In general, people cannot read executable code very easily.
Some people or groups keep their source code secret as their intellectual property. This approach is called Closed Source.
Some people or groups allow their source code to be distributed and viewed (and perhaps modified) freely by others under specific conditions. This approach is called Open Source. Audacity is an example of Open Source software.
Downloads page for Microsoft Windows version
of Audacity
http://audacity.sourceforge.net/windows.php
Audacity for Windows – with installation
software
http://audacity.sourceforge.net/latest/audacity-win.php/audacity-win.exe
Audacity VST
Enabler
http://audacityteam.org/vst/
MP3Licensing.com
http://www.mp3licensing.com/help/enduser.html
Audacity
Manual – On-line (World Wide
Web)
http://audacity.sourceforge.net/manual-1.2
Audacity
Manual –
Download
http://audacity.sourceforge.net/audacity-manual-1.2.zip
Exit other programs.
Double-click on the audacity-win-1.2.1.exe icon.
Follow the directions displayed.
Download audacity-manual-1.2.zip (for example, to the Windows Desktop).
Make a new
folder (for example, in the My Documents folder),
and rename the new
folder:
AudacityManual
Double-click on the icon for audacity-manual-1.2.zip.
Using EnZip (or other .zip management software), extract all the files from audacity-manual-1.2.zip into the new folder which you had named AudacityManual.
Double-click on the AudacityManual folder icon.
Double-click on the audacity-manual-1.2 folder icon.
Double click on the index.html file icon.
This option uses more disk space, but might help, especially if you delete the original file containing the audio captured.
Launch Audacity (Double-click the Audacity icon, for example).
Click File > Save Project As...
Browse to an appropriate location.
Type a file name (without the file extension).
Click Save.
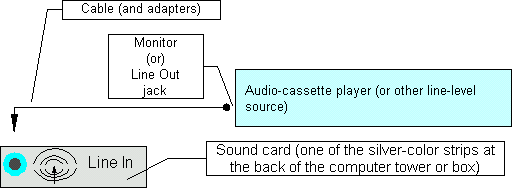
Use the proper cable(s) (and, if necessary, adapters) to connect your line-level sound-source (for example, the Monitor jack or Line Out jack of an audio-cassette player) to the Line In jack of the sound card in the computer system with Audacity.
Start playback of the sounds (for example, press the Play button on the audio-cassette player).
Shortly before you hear the first sound to be recorded, click on the Record button [the button with the red dot (●) in the Control Toolbar] in Audacity.
Click and drag the Input Volume slider (the slider is to the right of the picture of the microphone in the Mixer Toolbar) to get a strong (but not too strong) signal.
After you hear the last sound to be recorded, click on the Stop button [the button with the yellow-orange square (■) in the Control Toolbar] in Audacity.
In the Menu bar, click File > Save Project.
To prepare to play the recording from the beginning, click on the Skip to Start button [the button with the leftward-pointing magenta double triangle (│◄◄)].
Click on the Play button [the button with the rightward-pointing green triangle (►)].
Click and drag the Output Volume slider (the slider is to the right of the picture of the loudspeaker in the Mixer Toolbar) to get an appropriate (for example, listening) level.
Listen and watch the timeline-pointer (vertical line) move across the waveform (wavy line that stretches horizontally) representing the sound that you recorded. Find an excerpt that you want to move.
If you wish, click on the
Zoom In button [the button with the blue plus sign (+) in a magnifying glass]or
Zoom Out button [the button with the blue minus sign (-) in a magnifying glass].
When you hear the beginning of an excerpt to be moved, click on the Pause button [the button with the blue double vertical bars (║)].
Click and drag horizontally along the waveform from the beginning of the excerpt to the end of the excerpt.
Click on the Stop button [the button with the yellow-orange square (■) in the Control Toolbar] in Audacity.
In the Edit Toolbar,
click on the Scissors
picture or
in the Menu bar, click Edit
> Cut.
Click at the location where you want to put the excerpt.
In the Edit Toolbar,
click on the Clipboard
picture or
in the Menu bar, click Edit
> Paste.
In the Menu bar, click File > Save Project.
When you are ready to publish your edited audio, (in the Menu bar) click File.
Then
to
make a high-quality
(but big) audio
file,
(in the Menu bar) click Export
As WAV
to make a medium-quality
audio file (that is smaller,
but with some almost-inaudible sound-parts
discarded),
(in the Menu bar) click Export
As Ogg Vorbis...
Browse to an appropriate location.
Type a file name (without the file extension).
Click Save.
In the Menu bar, click File > Save Project.
In the Menu bar, click File > Exit.
Product, brand, and trade names in this and future communications may be trademarks or registered trademarks of their respective owners. Barry G. Wong and the Equinet Broadcasting Network shall not be liable for any errors, omissions, or lack of appropriateness, timeliness, or accuracy in, for your use of or your inability to use, or for any other aspect or matter relating to this or related communications.
At the time of writing, Barry G. Wong and the Equinet Broadcasting Network do not purport to represent any parties mentioned in this communication other than Barry G. Wong and the Equinet Broadcasting Network.